
If you have been following this series, you know where we are. The first version was a command-line script. The second integrated everything into the full threat intelligence platform. The third pulled the channel monitor out into a standalone Flask app with a web UI, job history, and live log streaming. because many people just wanted the channel monitor, not the whole platform.
This is the fourth update. Two new features, both built on top of the existing standalone UI. No new dependencies for either of them. Two changed files.
What Is New
Keyword Scan Mode
The original scan mode downloads everything. That works fine when you want a full archive of a channel. It is less useful when you are monitoring a high-volume channel and only care about a specific topic — a weapons system, a location name, a unit designation. You end up with thousands of messages and have to grep through them yourself.
Keyword scan changes that. Instead of saving everything, it scans the full channel history but only writes messages to disk when they match at least one of your keywords. Non-matching messages are processed, counted in the log, and then discarded. Their media is never downloaded.

The keyword input works as a tag box. You type a keyword and press Enter or comma to add it as a pill. Backspace on an empty field removes the last one. You can add as many as you need — the filter is OR logic across keywords, meaning a message matches if it contains any one of them.
Here is the part that matters for multilingual channels. Matching runs against both the original text and the English translation. So if you are monitoring a Farsi or Russian channel and you type your keywords in English, you still get matches. The translation happens first, then the filter check runs against both versions.
The end-of-scan log summarises what was filtered:
[i] Keyword filter: 1,243 messages skipped (did not match: missile, strike)
[✓] 17 messages saved → /data/jobs/abc123/
[✓] Scan completed
The ZIP you download at the end contains only the matching messages and their associated media. If a matching message has a photo attached, the photo is in the ZIP. If it does not match, the photo is never touched.
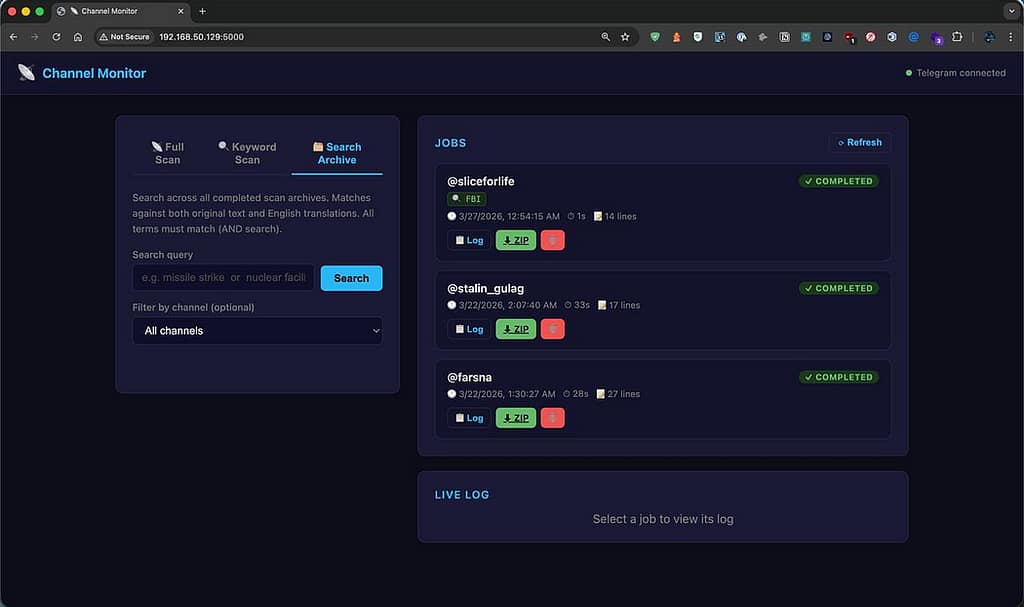
Archive Search
The second feature works on data you have already collected. Once you have a library of completed scans — full or keyword — you can search across all of them from inside the UI without opening a single ZIP file.

The search bar at the top takes plain text. All terms must match — it is AND logic. Searching for nuclear facility only returns messages that contain both words, not every message that mentions nuclear anything. You can filter results to a specific channel using the dropdown, which auto-populates from your completed jobs.
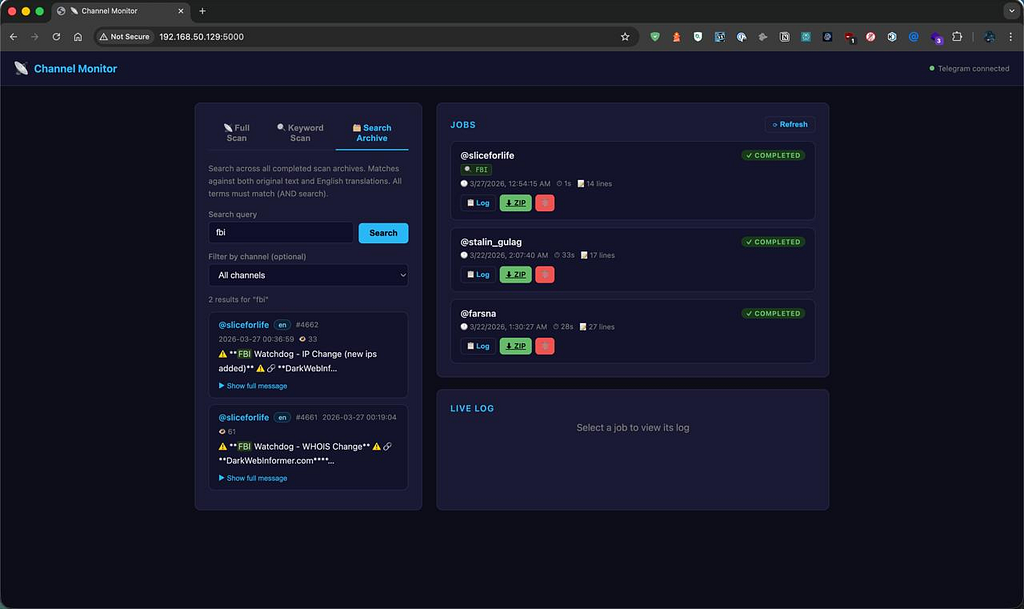
Each result card shows the channel, message ID, timestamp, detected language, media type if applicable, and a ~120 character excerpt centred around the first matched term with the keywords highlighted. If you want the full message, you click Show full message and it expands inline — original text in amber, English translation below it in green, same layout as the HTML report.

From the expanded card you can jump directly to download the ZIP for that job or open the job log in the right panel. You do not have to go hunting through the job history to find where a result came from.
The search runs entirely in Python against the messages.json files on disk. No database, no index, no additional infrastructure. Fast enough for normal archive sizes. If you end up with tens of thousands of scans it will slow down, but that is a later problem.
Updating
If you are already running the standalone UI, the update is two files and a service restart.
Pull the changes:
cd ~/channel-monitor-ui
git pull
sudo systemctl restart channel-monitor
That is it. No new pip installs, no migration, no changes to your .env. Your existing job history and session file are untouched.
If you are starting fresh:
git clone https://github.com/osintph/channel-monitor-ui.git
cd channel-monitor-ui
bash install.sh
sudo bash install-service.sh
Repo:
What Is Next
The roadmap from the last post had four items. Two are still pending, two are new additions based on feedback.
Still pending:
Cancel a running scan from the UI. Currently you either wait for it to finish or restart the service. A stop button is on the list.
Progress indication. The log tells you everything but there is no percentage bar for long scans with limit set to 0.
Coming next:
Scheduled scans. Set a channel and a keyword list to re-scan automatically every N hours. Combined with keyword mode this turns the tool into a proper passive monitor — it runs in the background and only collects what matches.
Message deduplication. Re-scanning a channel currently re-downloads everything. Storing the highest seen message ID per channel means subsequent scans only fetch new messages, which makes scheduled monitoring practical without ballooning your disk.
After those two are in, the tool will be close to what I originally had in mind — a lightweight, self-hosted Telegram intelligence collector that runs quietly in the background, filters for what you care about, and builds a searchable archive over time.
Session Messenger: 059db238ab37c3d92615c5cc24b694da29c598cc13e27886053722404118e14271
All monitoring was conducted on publicly accessible Telegram channels for research and OSINT purposes.
As usual:
- OSINT PH – Digital Forensics & Cybersecurity Consulting
- CyberNewsPH – Philippine Cybersecurity & Data Privacy News
- Sigmund Brandstaetter
Telegram Channel Monitor Gets Keyword Scanning and Archive Search was originally published in OSINT Team on Medium, where people are continuing the conversation by highlighting and responding to this story.