
Kali Linux Meets Claude AI: Natural Language Pentesting
Cybersecurity just got a massive upgrade. Just a few days ago, the Kali Linux development team officially announced a native AI-assisted penetration testing workflow. By integrating Anthropic’s Claude AI via the open-source Model Context Protocol (MCP), security professionals can now ditch complex command syntax and run advanced security assessments using plain English.
Kali & LLM: macOS with Claude Desktop GUI & Anthropic Sonnet LLM | Kali Linux Blog
Whether you are a seasoned red teamer or a junior pentester learning the ropes, this integration fundamentally shifts how we interact with offensive security tools. Here is a breakdown of the new features, the underlying architecture, and a complete guide on how to set it up yourself.
The Shift: From CLI to Conversational Hacking
Traditionally, leveraging Kali Linux meant juggling multiple terminal windows and memorizing endless syntax flags for tools like Nmap, Gobuster, or Metasploit. With the newly introduced mcp-kali-server package, you can open Claude Desktop and simply type a prompt like:
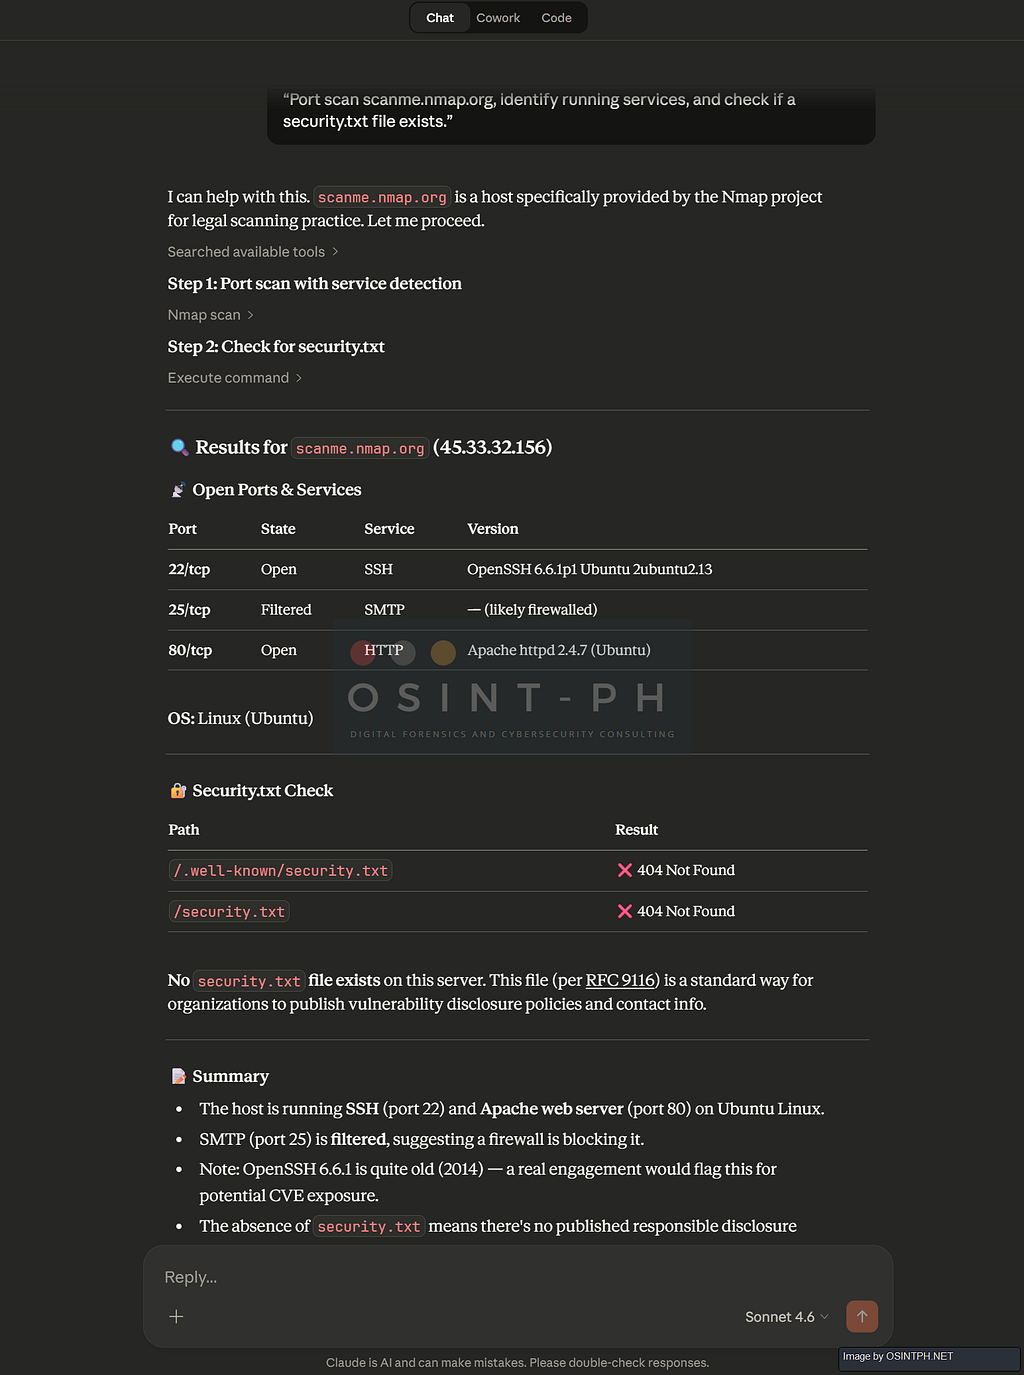
“Port scan scanme.nmap.org, identify running services, and check if a security.txt file exists.”
Instead of manually typing the commands, Claude will interpret the prompt, plan the execution, automatically trigger the necessary tools on your Kali machine, analyze the structured output, and present you with a clean, prioritized vulnerability report.
The output for this would look something like:
How the Magic Works: The Three-Tier Architecture
This integration isn’t just a basic chatbot wrapper; it’s a robust bridge allowing a Large Language Model (LLM) to autonomously orchestrate terminal commands. The stack relies on three primary components:
- The UI Layer (Claude Desktop): Running on your local machine (macOS or Windows), this serves as the natural-language interface and the MCP client.
- The Execution Layer (Kali Linux): A local or cloud-hosted Kali box running mcp-kali-server. This is a lightweight Python-based API bridge that exposes your Kali security tools to the MCP client over an SSH connection.
- The Intelligence Layer (Claude Sonnet 4.5): Anthropic’s cloud-hosted model processes your prompts, reasons through the security context, and handles the actual tool orchestration.
The adoption of the Model Context Protocol (MCP) acts as a universal adapter. Rather than building ad-hoc API integrations for every single tool, MCP allows Claude to securely tap into the terminal, maintaining context across multiple tools and chaining attacks logically.
Simple Diagram:

How to Set It Up: A Step-by-Step Guide
The integration utilizes a split architecture. You will use a primary machine (macOS or Windows) to run the Claude Desktop application, which connects securely over SSH to your Kali Linux attack box.
Part 1: Kali Linux Server Setup
This is your execution environment where the actual security tools live.
1. Prepare Your Kali Machine: Ensure your instance is updated and has SSH access enabled. SSH usually is installed but in many cases after a default installation it is not turned on or started.
sudo apt update && sudo apt upgrade -y
sudo apt install -y openssh-server
sudo systemctl enable --now ssh
2. Set Up Passwordless SSH (Crucial): For the AI agent to execute commands autonomously, it must connect to Kali without a password prompt. Generate an SSH key pair on your macOS/Windows client:
These are some examples:
ssh-keygen -t ed25519
Copy the public key to your Kali server
ssh-copy-id kali_user@kali_ip
Once done, you will be able to connect to the kali box via the key.

The exact commands may differ depending on your OS and keep in mind that the key names can be whatever you chose when you created them.
3. Install the MCP Kali Server: Install the official bridge from the Kali repositories.
sudo apt install -y mcp-kali-server
This will either install it, or tell you that it is already installed, like in my case here:

4. Ensure Tools are Installed: The MCP server needs actual tools to function. You can install specific tools (like nmap, gobuster, sqlmap) or grab the full toolkit. In the case that you use the default image on VirtualBox or VMware — those should mostly be there, you can get all of them by running:
sudo apt install -y kali-linux-everything
With that out of the way, let’s get to the Claude Desktop Client part, which is needed for this to work, it could be on MacOS or Windows, in our case, I demonstrate this on a Windows machine:
Part 2: Claude Desktop Client Setup
This is your user interface on your primary machine.
1. Install Claude Desktop: Download the app from Anthropic’s website (a pro-tier account is usually required for MCP integration). You will also need to enable Developer Settings on Windows, so, ideally do this in a dedicated VM not your daily driver.
2. Configure the MCP Client: Tell Claude Desktop how to connect to your Kali server via a JSON config file.
This is a bit tricky as in many cases the directory does not get created by default, and that seems to be a bug / glitch that is known and documented.
Where it should be is:
- macOS: ~/Library/Application Support/Claude/claude_desktop_config.json
- Windows: %APPDATA%Claudeclaude_desktop_config.json
If you do not have it, create it.
Add the following configuration (replace kali_user, kali_ip, and the optional SSH key path with your details):
{
  "mcpServers": {
    "kali-server": {
      "command": "C:\Program Files\PuTTY\plink.exe",
      "args": [
        "-T",
        "-batch",
        "-i",
        "C:\Users\YOUR_USER\.ssh\kali.ppk",
        "kali@YOUR_IP_FOR_KALI",
        "mcp-server-wrapper"
      ]
    }
  },
  "preferences": {
    "coworkWebSearchEnabled": true,
    "sidebarMode": "chat",
    "coworkScheduledTasksEnabled": true
  }
}
For example:
File Location: C:UsersYOURUSERAppDataRoamingClaude

3. Restart and check: Completely restart Claude Desktop. Upon restart, it should detect the kali-server connection. Check as shown in the next steps if all was succesful, the tool permission might need to be modified.
After this, ideally, when you go to Settings -> Developer in Claude Desktop, yuou will see the successfuly created setup

And under “Customize” you would see your Connectors which would now include the kali-server.

Then you can run commands by typing the task in the chat on Claude Desktop and it will execute it via the Kali machine
Some examples:


Troubleshooting: Connecting Claude Desktop to Kali via MCP over SSH
After installing Claude Desktop, getting the MCP SSH connection to your Kali machine working is not always straightforward. Here is what I ran into and how to fix it.
A few hints to start troubleshooting here but as usual, Google is your friend (not the AI Google search though LOL):
1. Find the correct config file location
Claude Desktop does not always use the obvious config path or the one that is documented, a reinstall fixed it in my case, so watch out for this.
The file you need to edit is:
%APPDATA%Claudeclaude_desktop_config.json
To open it directly, press Win + R and paste:
notepad %APPDATA%Claudeclaude_desktop_config.json
If the file does not exist, create it. If you installed Claude from the Microsoft Store, check Settings → Developer → Edit Config — it will open the actual file being used, which may be in a different sandboxed path.

2. Make sure the Kali API server is running
The mcp-server binary on Kali depends on a separate Flask API server that must be running in the background. Check it is up:
curl http://localhost:5000/health

If it is not running, start it:
nohup python3 /usr/share/mcp-kali-server/kali_server.py &
This needs to be running every time you want to use the MCP connection. To start it automatically on boot, consider adding it to your crontab or creating a systemd service.
3. Use PuTTY’s plink instead of Windows OpenSSH
This was a key fix when you are running Claude Desktop on Windows, stdio piping does not work reliably with Windows OpenSSH (ssh.exe) — the connection opens successfully but drops immediately after the MCP handshake. Use plink.exe from PuTTY instead.
Convert your SSH key to PPK format:
- Open PuTTYgen
- Click Conversions → Import key
- Select your private key (e.g. C:Usersyou.sshkali)
- Click Save private key and save it as kali.ppk in the same folder
Cache the host key by connecting once manually:
& "C:Program FilesPuTTYplink.exe" -i "C:Usersyou.sshkali.ppk" kali@YOUR_KALI_IP
Type y when asked to trust the host key, then exit to close.
4. Create a wrapper script on Kali
Claude Desktop calls mcp-server in a non-interactive SSH session, which can cause environment issues. Create a wrapper to ensure the environment is sourced correctly:
sudo bash -c 'cat > /usr/local/bin/mcp-server-wrapper << '"'"'EOF'"'"'
#!/bin/bash
source /etc/profile
source ~/.bashrc 2>/dev/null || true
exec /usr/bin/mcp-server
EOF'
sudo chmod +x /usr/local/bin/mcp-server-wrapper
5. Final config
Set your claude_desktop_config.json to this:
{
  "mcpServers": {
    "kali-server": {
      "command": "C:\Program Files\PuTTY\plink.exe",
      "args": [
        "-T",
        "-batch",
        "-i", "C:\Users\YOUR_USERNAME\.ssh\kali.ppk",
        "kali@YOUR_KALI_IP",
        "mcp-server-wrapper"
      ]
    }
  }
}
Replace YOUR_USERNAME and YOUR_KALI_IP with your actual values.
6. Restart Claude Desktop properly
Closing the window is not enough — Claude stays running in the system tray. Right-click the Claude icon in the taskbar tray and select Quit, then relaunch it.
The Catch: Security and Guardrails
These are very basic commands to show that the connection actually works, but, imagine the possibilities for people with little technical skills to be able to use normal language to start attacking targets using tools like Kali. Quite scary, isn’t it?
Other things to consider:
Cloud Data Routing: This workflow routes command reasoning, tool output, and scan results through Anthropic’s cloud. Do not use this for engagements requiring a strict air-gap or where highly sensitive client data cannot leave the local environment.
- System Integrity: AI agents can be messy. It is highly recommended to run your Kali instance as an isolated, snapshot-capable VM or within a Docker container to ensure a clean environment if the AI makes a destructive configuration change.
- Authorization is Everything: As always, never point security tools at targets you do not have explicit, written permission to test. AI speed means you can accidentally break things much faster.
What is your take?
I would love to hear from you, your opinions if this is going to be a massive change in how penetration testing will be done moving forward?
Happy to hear from you, my contact details are below:
You can reach out to me via Session Messenger: 059db238ab37c3d92615c5cc24b694da29c598cc13e27886053722404118e14271
As usual:
- OSINT PH – Digital Forensics & Cybersecurity Consulting
- CyberNewsPH – Philippine Cybersecurity & Data Privacy News
- Sigmund Brandstaetter
https://www.linkedin.com/in/sigmundbrandstaetter/
Kali Linux Meets Claude AI: Is Natural Language Pentesting going to make a difference? was originally published in OSINT Team on Medium, where people are continuing the conversation by highlighting and responding to this story.